Mini Piñata Cakes
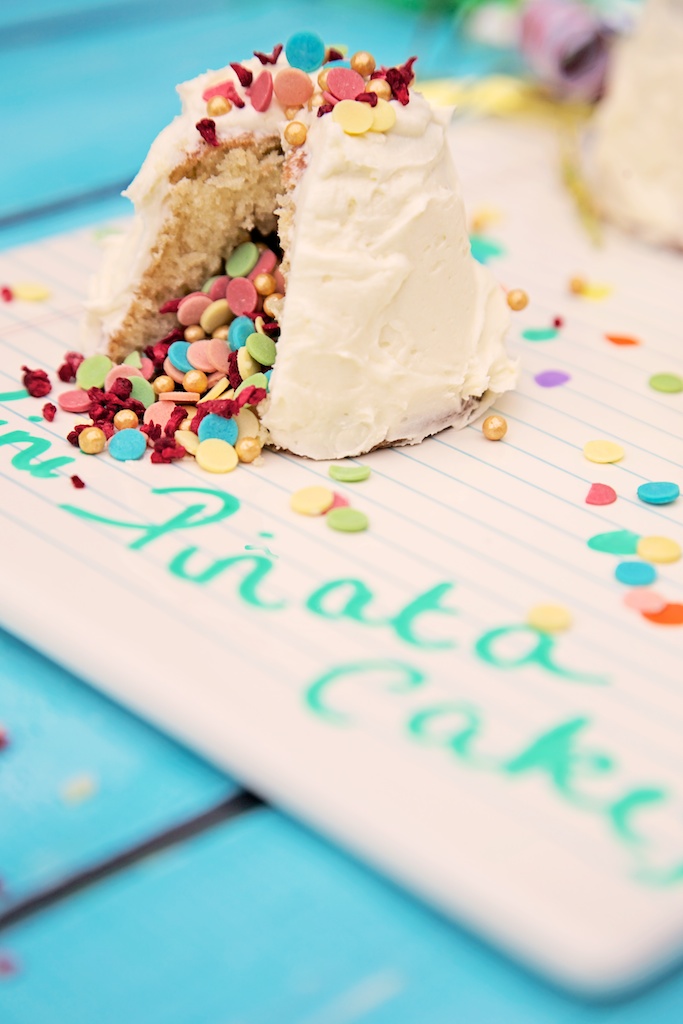
There's something about miniature cakes that is just so much sweeter! I've seen gorgeous giant rainbow piñata cakes but even one slice is too big for my boys. So why not try a mini version of the piñata classic.
Perfect for little ones to help with and a total surprise for your party guests.
One of my oldest friends from University just happened to be able to stop in on route to Cornwall for the weekend. I haven't seen her for over 3 years as, she and her husband have been living and working in Australia.
So what do you do when you have a child asleep mid afternoon and you can't leave the house on a grey, drizzly day?
Bake a cake. Or rather, Mini Piñata Cakes!
I have seen the large versions before but never small ones, eat in 3 mouthful ones.
So we gave it a go.
Ingredients (Makes 6 small cakes) :
- 65g/2oz butter
- 65g/2oz caster sugar
- 2 medium eggs
- 65g/2oz sieved self raising flour
- 2 drops rose water
Pre heat the oven to 180 degrees or Gas Mark 4.
Add your butter and sugar to a large mixing bowl and whisk until the mixture forms a pale fluid consistency with no lumps!
Add your eggs and whisk together. Add the sieved flour a little at a time. Sift your flour in from a height as this will get more air into your cake and make it light and fluffy. (I whisked the whole mix, but some recipes will tell you to fold in the flour.)
Pour into moulds, I used the flower pot moulds I normally use in Sammy's Bento lunches, as they are nice and tall.
Tap the moulds on the work top to remove any air bubbles.
Tidy the tops with a piece of kitchen roll to remove any drips of mixture that could burn in the oven.
Bake for 20 minutes. I checked on mine a couple of times and at 15 minutes placed a skewer (or rather a fondue fork) into the centre. If the skewer comes out clean they are ready.
Leave to cool (in the moulds) on a wire rack for 10 minutes.
When cool gently tease your cakes from the moulds. You can grease your moulds with kitchen paper and butter beforehand, to ease this process.
Cut the uneven tops off and eat them!
Use a sharp serrated knife to carve out a hollow in the centre. You can get a nifty gadget called a cupcake corer, that does this for you.
The freshly cut top will form the flat base of your cake.
Fill your hollow with sprinkles or sweets of your choice.
Using a little of the hollowed out leftover cake replace the top and cover with edible paper or baking paper. This enables the cake to hold it's shape and contents!
Ice with the following buttercream, as generously and rustic as you like!
Ingredients:
- 140g/5oz butter
- 280g/10oz icing sugar
- 25ml white chocolate liqueur (optional but completely delicious)
Whisk the butter in a mixing bowl and start to add the icing sugar slowly. I used an electric whisk and the surface around you does get dusty! Queue lots of ghostly faces in our house! Start on a slow speed and work up. Add the liqueur half a little at a time to suit your taste.
Use a knife to paddle the creamy icing around the cake, the more rustic the better. Remember piñatas are rough in texture!
Sprinkle your finished cakes with some left over sprinkles.
Perfect for parties or for little favours.
The rose water adds a delicateness to the sponge and the crunchy sprinkles, mixed with some freeze dried raspberries adds texture and crunch.
Slice into your mini cakes and watch your surprise come tumbling out!
Next time I might change the rose water to orange blossom and fill the inside with fruit!
You can find this recipe on my Pinterest board so feel free to pin away!


